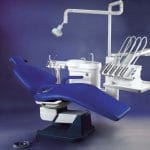
As a dental professional, you know that a clean, well-maintained dental chair is vital for ensuring patient safety and comfort. Your dental chair is not just the centerpiece of your operatory; it is also a significant investment in your practice. In this comprehensive guide, we will explore essential steps for cleaning and maintaining your dental chair, helping you extend its lifespan while providing exceptional care for your patients.
Why Regular Dental Chair Maintenance Matters
Maintaining a clean and functional dental chair is crucial for several reasons:
- Infection Control: Regular cleaning and disinfection prevent the spread of harmful pathogens, safeguarding both patients and staff.
- Patient Comfort: A well-maintained chair enhances the patient experience, fostering trust and loyalty in your practice.
- Equipment Longevity: Consistent care extends the life of your dental chair, ultimately saving you money.
- Professional Image: A clean, well-functioning dental chair projects professionalism and instills confidence in your patients.
Daily Cleaning and Disinfection
To maintain a hygienic environment, it’s essential to clean and disinfect your dental chair after each patient. Follow these steps for effective daily maintenance:
- Wear Personal Protective Equipment (PPE): Always don gloves, safety glasses, and a mask to protect yourself from potential contamination.
- Surface Cleaning: Use a mild soap and warm water solution or a cleaner specifically designed for dental chairs. Avoid alcohol, bleach, or ammonia-based cleaners as they can damage the upholstery.
- Disinfection: Apply a disinfectant to a clean cloth and wipe down all surfaces of the chair. Ensure surfaces remain wet for the recommended contact time (usually 2-3 minutes).
- Rinse and Dry: Use a clean, damp cloth to remove any residual disinfectant, then dry surfaces with a soft towel.
- Dispose of PPE: After cleaning, remove gloves and masks properly and wash your hands thoroughly.
Instrument Maintenance and Sterilization
Proper maintenance of your dental instruments is equally important. Here are key steps to follow:
- Pre-Soaking: If immediate cleaning isn’t possible, spray instruments with an enzymatic solution to keep organic debris moist until you can clean them.
- Ultrasonic Cleaning: Use an ultrasonic cleaner with an appropriate cleaning solution to effectively remove debris from instruments.
- Drying: Thoroughly dry instruments before packaging them for sterilization to prevent moisture from compromising the process.
- Packaging: Place instruments in sterilization pouches or wraps, ensuring they are sealed correctly.
- Sterilization: Load instruments into the autoclave according to manufacturer guidelines for spacing and cycle settings.
Weekly and Monthly Maintenance Tasks
In addition to daily cleaning, perform these tasks weekly or monthly to keep your dental chair in top condition:
Weekly Tasks
- Flush water lines thoroughly to prevent bacterial buildup.
- Clean and lubricate O-rings on handpiece couplers.
- Check and replace the main suction trap if necessary.
Monthly Tasks
- Inspect upholstery for signs of wear or damage.
- Lubricate moving parts like the chair’s hydraulic system per manufacturer recommendations.
- Verify that safety features such as backrest and armrest locks are functioning properly.
Tackling Stubborn Stains and Hard-to-Reach Areas
For tough stains or difficult-to-clean areas, consider these tips:
- Stubborn Stains: Use a soft-bristled brush or dental pick to gently scrub affected areas without damaging upholstery.
- Hard-to-Reach Areas: Utilize small brushes or cotton swabs to clean tight spaces and crevices effectively.
- Upholstery Protection: Consider using disposable barriers to shield your chair’s upholstery from stains and damage.
Embracing Eco-Friendly Cleaning Practices
As the dental industry shifts towards sustainability, consider incorporating eco-friendly cleaning products that are safe for both your dental chair materials and the environment. Look for products that are:
- Biodegradable
- Non-toxic
- Free from harsh chemicals
Additionally, investing in advanced upholstery made from stain-resistant materials can simplify cleaning and maintenance over time.
The Value of Professional Maintenance
While daily care is essential, scheduling regular professional maintenance is equally important. A qualified technician can:
- Inspect mechanical and electrical components of the chair.
- Identify potential issues before they escalate into major problems.
- Perform necessary repairs or replacements.
- Ensure optimal operational efficiency.
Most manufacturers recommend professional maintenance at least once a year. Adhering to this schedule can significantly extend the life of your dental chair while minimizing costly downtime.
Conclusion
Cleaning and maintaining your dental chair is not just about hygiene; it’s about enhancing patient care and protecting your investment. By following the steps outlined in this guide and staying informed on industry best practices, you can ensure a safe, comfortable environment for your patients while reinforcing your commitment to quality care.
Remember, prioritizing dental chair maintenance not only elevates your professional image but also contributes significantly to the overall success of your practice. By taking these proactive measures, you demonstrate dedication to providing exceptional care while fostering trust among your patients.
The best solution for cleaning a dental chair is a gentle, non-abrasive detergent mixed with warm water. For commercial options, products like Hager’s Chair Cleaner & Polish are recommended, especially for leather and vinyl upholstery. For a homemade solution, you can use a 10% mixture of non-ionic liquid dish soap in warm water. Always apply with a soft cloth to avoid damage to the chair’s surfaces.
The dental chair should be cleaned daily to remove dirt and debris and disinfected between each patient to prevent cross-contamination. For thorough cleaning, a more comprehensive maintenance routine should be performed at least once a week, ensuring all aspects of the chair are addressed.
It’s important to use caution with alcohol-based disinfectants as they can cause drying, cracking, or discoloration over time. Always check the manufacturer’s recommendations for your specific dental chair model. If disinfection is necessary, use a hospital-grade disinfectant suitable for use on upholstered surfaces and follow the instructions carefully.
The barrier technique involves using disposable covers or barriers on parts of the dental chair that are touched frequently, such as the headrest, armrests, and control panels. These barriers are replaced between patients and help protect the chair’s surfaces from contamination, making cleaning easier and extending the life of the chair’s finish.
To clean dental chair water lines, follow the manufacturer’s instructions for your specific model. Typically, this involves flushing the lines with a specialized dental waterline cleaner to remove biofilm and prevent microbial growth. For dental chair traps, remove the trap, discard the contents, and clean it with a brush and the recommended cleaning solution before reinserting it into the chair.